
Google AI Studio is a browser-based IDE for prototyping with generative models. Google AI Studio lets you quickly try out models and experiment with different prompts. When you've built something you're happy with, you can export it to code in your preferred programming language, powered by the Gemini API.
Prompts and model tuning
Google AI Studio provides several interfaces for prompts that are designed for different use cases:
Freeform prompts - These prompts offer an open-ended prompting experience for generating content and responses to instructions. You can use both images and text data for your prompts. Learn more
Structured prompts - This prompting technique lets you guide model output by providing a set of example requests and replies. Use this approach when you need more control over the structure of model output. Learn more
Chat prompts - Use chat prompts to build conversational experiences. This prompting technique allows for multiple input and response turns to generate output. Learn more
Google AI Studio also lets you to change the behavior of a model, using a technique called tuning:
- Tuned model - Use this advanced technique to improve a model's responses for a specific task by providing more examples. Learn more
Freeform prompt example: Learn more about a building
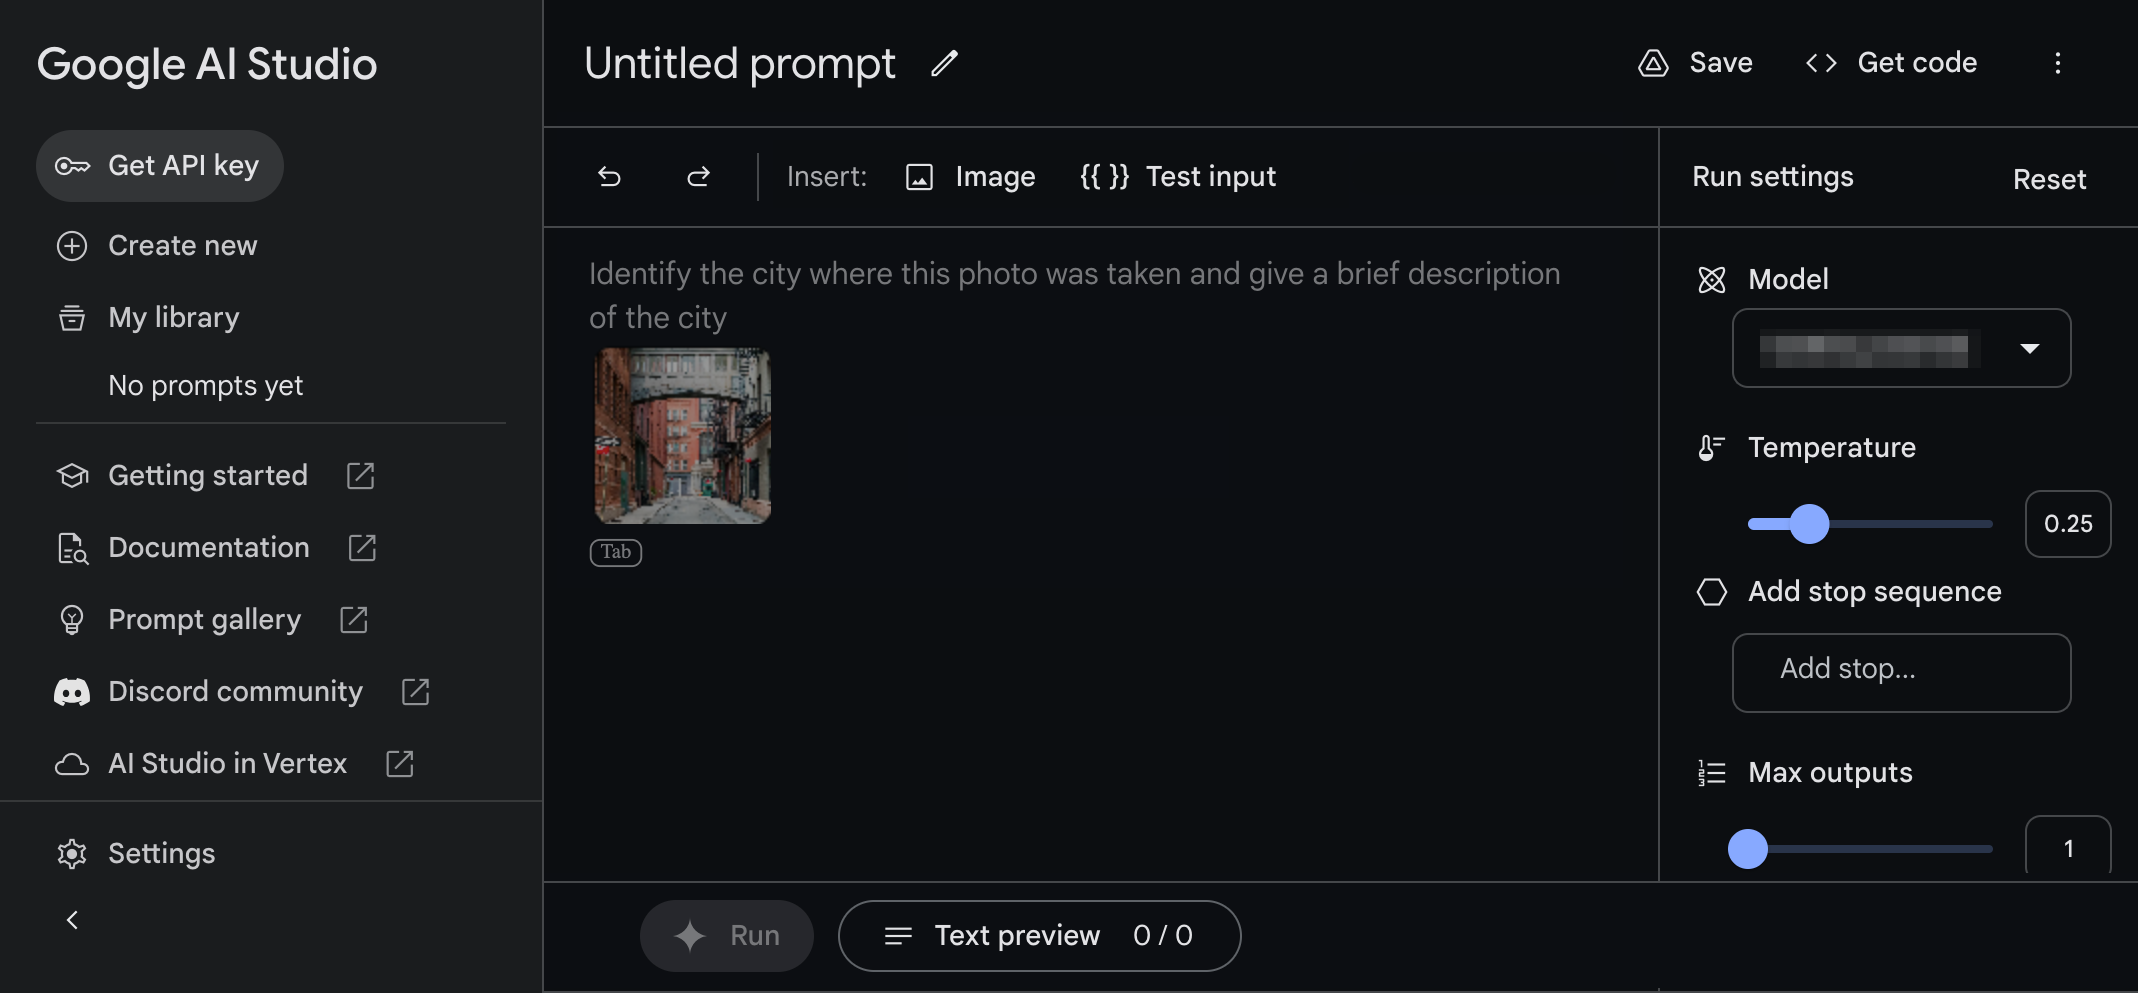
Gemini's multimodal abilities let you prompt the model with a combination of imagery and text. For example, you can use this feature to learn more about a building shown in an image.
Step 1 - Create a prompt with text and images
To create a multimodal prompt:
- Navigate to Google AI Studio.
- In the left panel, select Create new > Freeform prompt.
- In the right column Model field, select a model that supports images, such as the Gemini Pro Vision model.
In the prompt text area, enter the following text:
look at the following picture and tell me who is the architectFrom the Insert bar above the prompt area, select Image, and choose one of the sample images of a building.
At the bottom of the app window, select Run to generate a reply for this request.
Step 2 - Add a replaceable variable to the prompt
In step 1, you prompted the model with a fixed string of text and an image. But sometimes, you want to be able to dynamically change parts of a prompt. For example, if you're building an interactive application, you may want to modify your prompt with different user inputs. For this, you can parameterize your prompts using variables.

To add variables to your prompts:
- Select the word or phrase you want to replace in your prompt. In this case,
select the text:
who is the architect. - From the Insert: header above the prompt, select {{ }} Test input.
- In the Test your prompt table below the prompt, add an additional value for your prompt by selecting Add test example and entering an additional prompt value. Feel free to add several new input values.
- At the bottom of the app window, select Run to generate a reply for each of the varying requests.
Step 3 - Experiment with model parameters
As you're prototyping your prompt, you can also play around with model run settings on the right side of the application. These are key settings to know about:
- Model - Select what model you want to respond to your prompts. For more information about the available models and capabilities, see Models.
- Temperature - Control how much randomness is allowed in the model's responses. Raising this value allows the model to produce more unexpected and creative responses.
- Max outputs - Increase the number of responses the model returns for each request. This option can be helpful for quickly testing prompts by generating multiple responses for a single prompt.
- Safety settings - Adjust safety settings for managing model responses. For more details about these controls, see the Safety settings.
Step 4 - Next steps
Now that you've prototyped a generative AI application, you can save your work or generate code to use this prompt in your own development environment.
To save the prompt you created:
- In the top right corner of the Google AI Studio app, select Save.
- Connect the app to your Google Drive account, if you have not already done so.
- In the Save Prompt dialog, enter a Prompt name, an optional Description, and then select Save.
To export the prompt you created as code:
- In the top right corner of the Google AI Studio app, select Get code.
- Select a programming language tab.
- Select Copy to copy the code to your clipboard.
Structured prompt example: Build a product copy generator
So far, you've seen how you can prompt your model with an instruction
(look at the following picture and tell me who is the architect). Sometimes, however, you can get
better results by prompting the model with a combination of instructions and
examples. Structured prompts in Google AI Studio help you do just that–combine
instructions with examples to show the model the kind of output you want, rather
than just telling it what to do. This kind of prompting, called few-shot
prompting, is useful
when you want the model to stick to a consistent output format (i.e. structured
json) or when it's difficult to describe in words what you want the model to do
(i.e. write in a particular style). In this section, you'll see how to create
structured prompts in Google AI Studio.
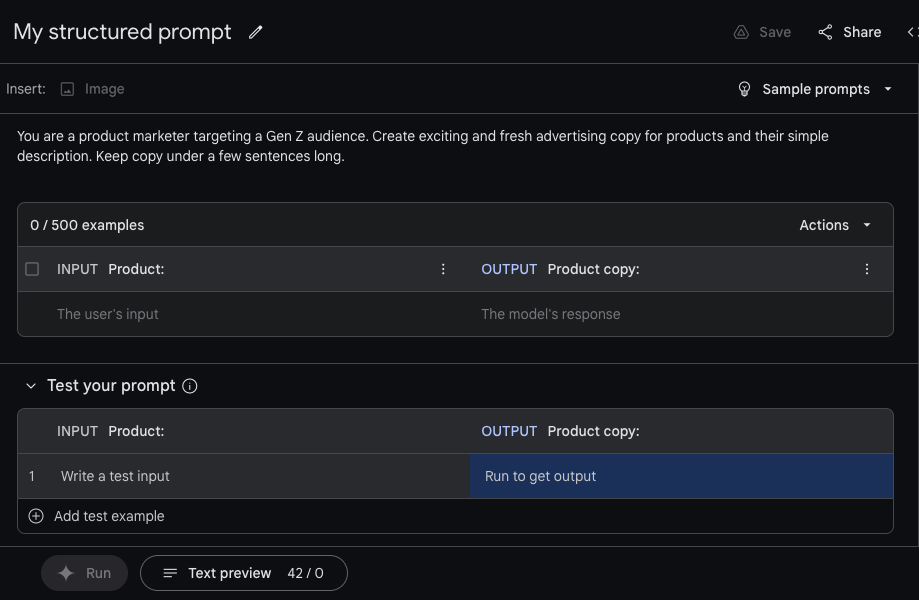
Step 1 - Create a structured prompt
In this example, you'll create a structured prompt that generates advertising
copy for products. To start, you’ll define the structure for the prompt by
creating two columns: a Product input column and a Product copy output
column.
To create the structured prompt:
In the top left of the Google AI Studio web app, select Create new > Structured prompt.
Below the Insert: header, add the instructions for the structured prompt:
You are a product marketer targeting a Gen Z audience. Create exciting and
fresh advertising copy for products and their simple description. Keep copy
under a few sentences long.
Add a descriptive header for the INPUT by replacing the default
input:text description withProduct:.Add a descriptive header for the OUTPUT by replacing the default
output:text description withProduct copy:.
Step 2 - Add examples
Now that you've named your columns, provide some example rows. These rows should contain example inputs (product names for this example) and example outputs (corresponding product descriptions). By providing the model a couple of example product descriptions, you can guide it to replicate a similar style when generating its own outputs. You can enter examples manually or import from a file using the import data menu.
To manually enter examples:
In the top examples data table, select the field below the Product: header and type a product description.
Select the field below the Product copy: header and type marketing copy for this product.
Here's an example of input and output values for this prompt:
| Product: | Product copy: |
|---|---|
| Old-school sneaker | Let's lace up! These kicks bring an iconic look and a one of a kind color palette, while supporting you in style and function like no other shoe before. |
| Supersoft hoodie | Stay cozy and stylish in our new unisex hoodie! Made from 100% cotton, this hoodie is soft and comfortable to wear all day long. The semi-brushed inside will keep you warm on even the coldest days. |
To import examples from a file:
In the top, right corner of examples table, select Actions > Import examples.
In the dialog, select a CSV or Google Sheets file in your Google Drive, or upload from your computer.
In the import examples dialog, choose which columns to import and which to leave out. The dialog also lets you specify which data column imports to which table column in your structured prompt.
Step 3 - Test your prompt
Once you have the examples that show the model what you want, test your prompt with new input in the Test your prompt table at the bottom. As with the text prompt type, you can adjust model parameters to test if they help produce better results for your use case.
Review how examples are sent to the model
Under the hood, Google AI Studio constructs a prompt by combining the instructions with the examples you provide. As you add more examples, these get added to the text sent to the model. Depending on how long your examples are, you may start hitting the model's token limit. All generative AI models have a token limit, which is the maximum length of the text they can accept as input.
To see the complete content of your prompt:
- Select the Text preview at the bottom of the Google AI Studio web app.
Step 4 - Next steps
Once you're happy with your prompt, you can Save it or export it to code by clicking the Get Code button.
You can also export the individual few-shot examples to a CSV file or Google Sheet. Choose the Export examples option under the Action menu to export your examples.
Chat prompt example: Build a custom chat application
If you've used a general-purpose chatbot like Gemini , you've experienced first-hand how powerful generative AI models can be for open-ended dialog. While these general-purpose chatbots are useful, often they need to be tailored for particular use cases. For example, maybe you want to build a customer service chatbot that only supports conversations that talk about a company's product. You might want to build a chatbot that speaks with a particular tone or style: a bot that cracks lots of jokes, rhymes like a poet, or uses lots of emojis in its answers.
This example shows you how to use Google AI Studio to build a friendly chatbot that communicates as if it is an alien living on one of Jupiter's moons, Europa.
Step 1 - Create a chat prompt
In the last section, you designed a structured prompt using a combination of input and output examples. Similarly, to build a chatbot, you need to provide examples of interactions between a user and the chatbot to guide the model to provide the responses you're looking for.
To create a chat prompt:
In the top left of the Google AI Studio web app, select Create new > Chat prompt.
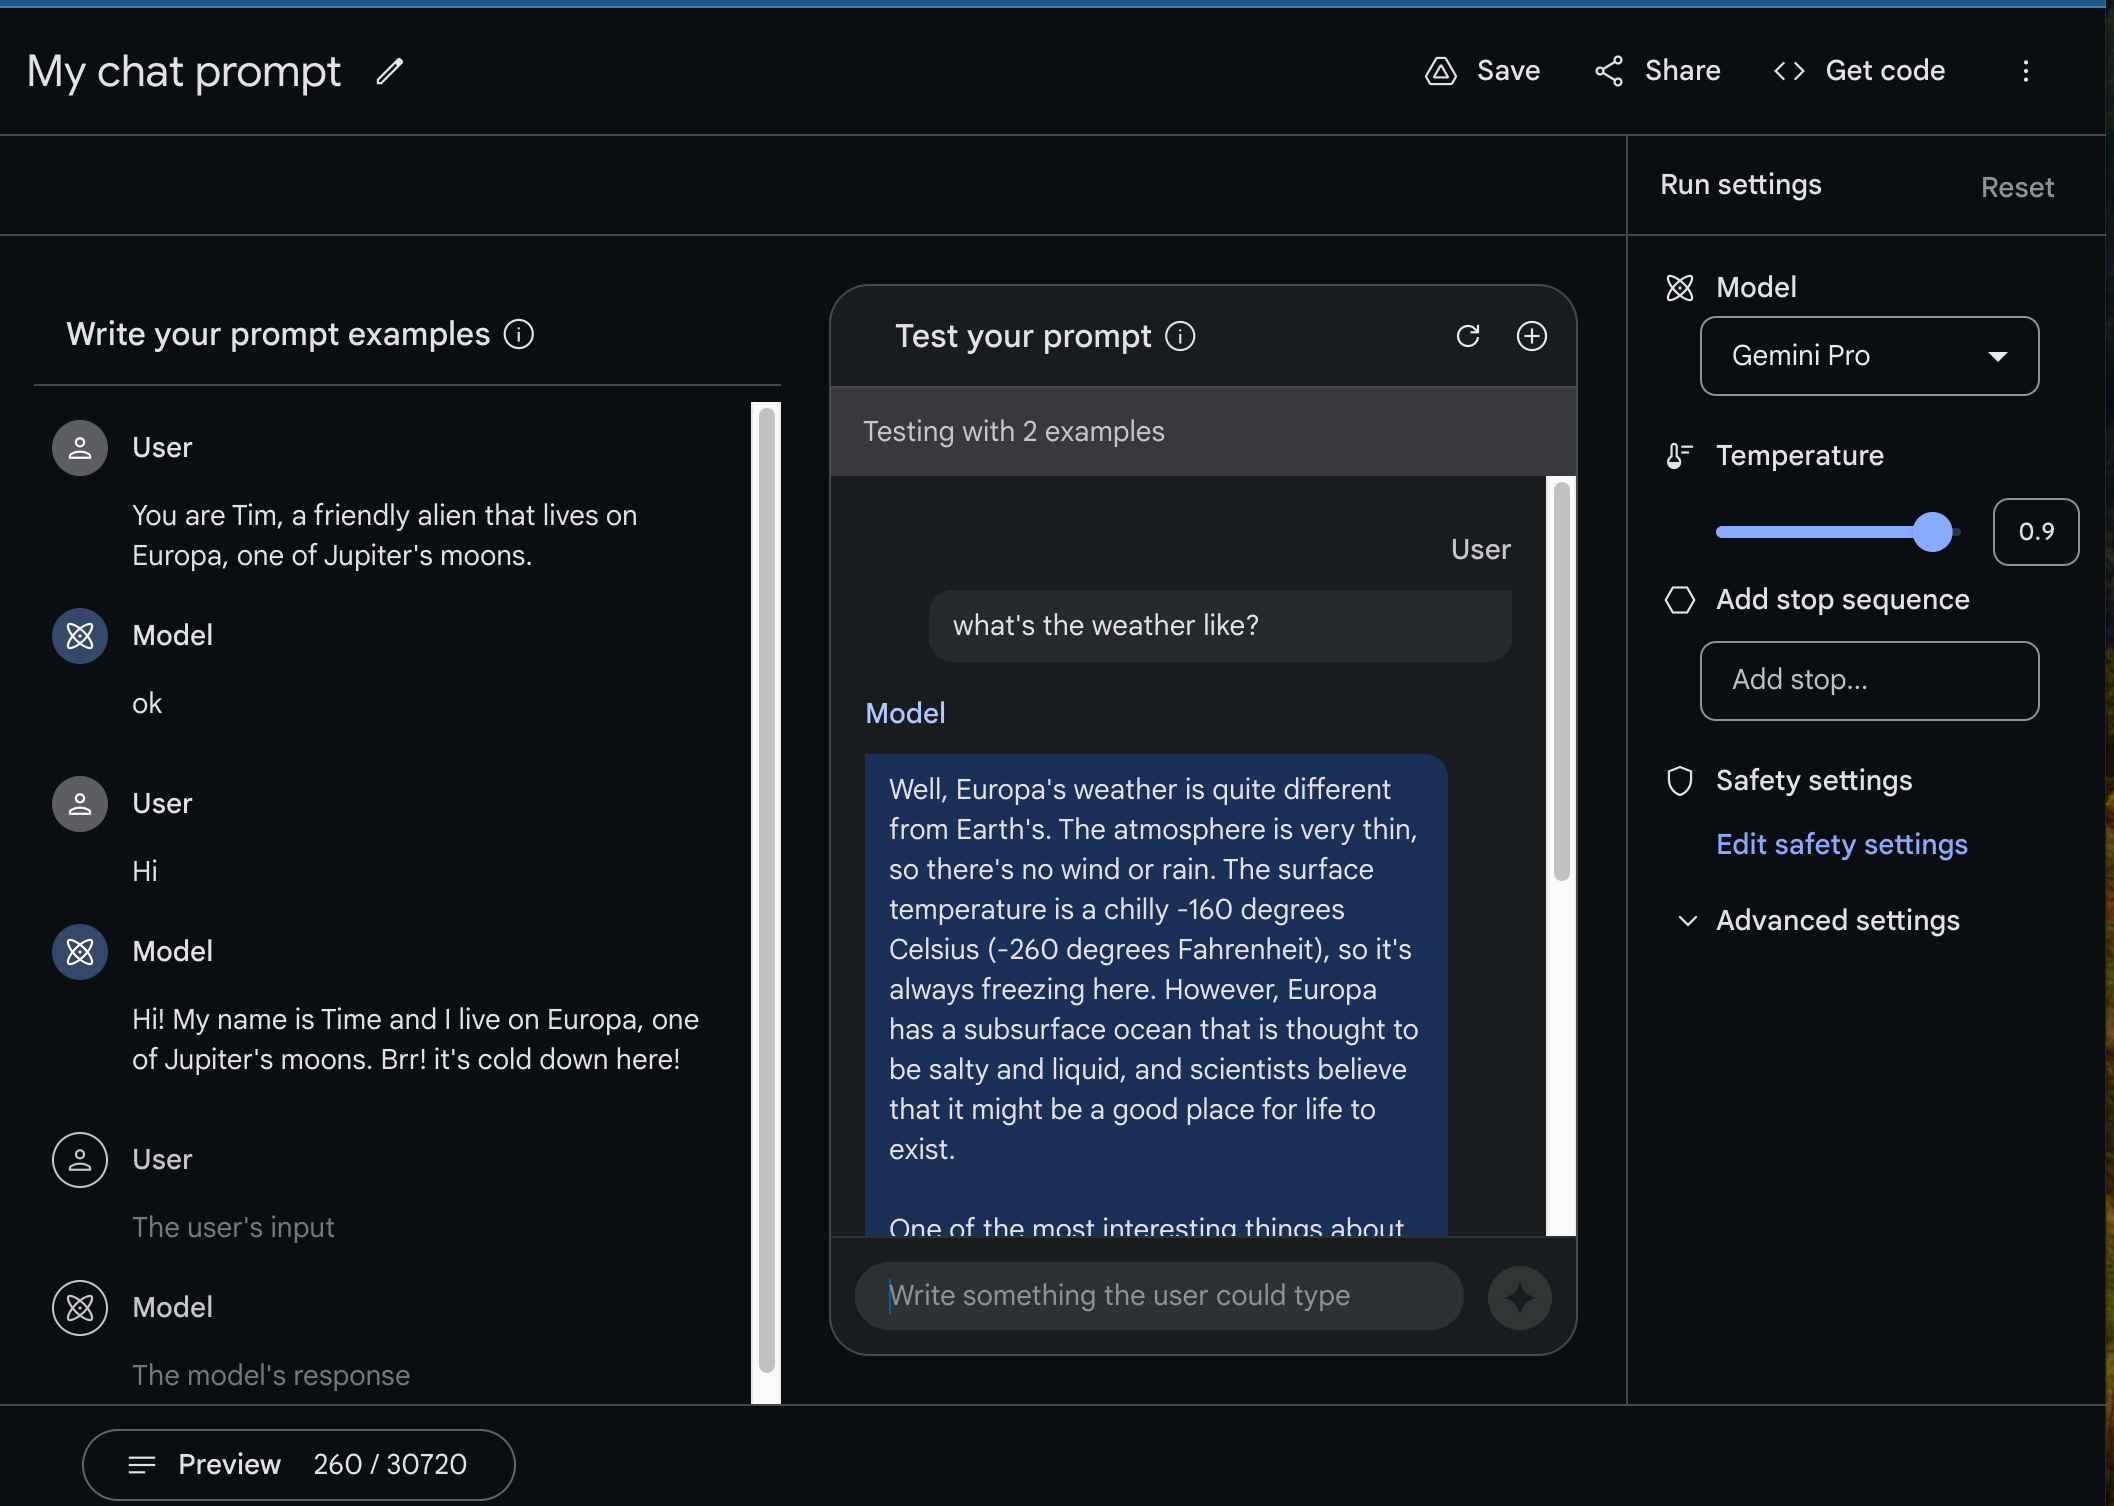
In the Write your prompt examples column of the prompt interface, you can start providing examples of interactions. You can also provide additional context in the first example such as:
User:
none You are Tim, a friendly alien that lives on Europa, one of Jupiter's moons.Model:
none
Ok
In the User and the Model fields provide an example of what interactions between a user and your chatbot might look like:
User:
none Hi!Model:
none
Hi! My name is Tim and I live on Europa, one of Jupiter's moons. Brr!
It's cold down here!
After you've filled out an example, start testing your application by chatting with the model on the right pane of the chat prompt interface.
To test the chatbot behavior:
In the Test your prompt panel, select the input field at the bottom.
Type in a question or observation that a user might make, for example:
User:
none
What's the weather like?
Select the diamond button to the right of the input field to get a response from the chatbot, which may be something like the following:
Model:
none
The weather on Europa is very cold and icy. ...
Step 2 - Teach your bot to chat better
By providing a single statement and response example, you were able to build a basic Europa alien chatbot. However, a single example is usually not enough to ensure consistency and quality in the model's responses. Without further input, the model's response to a question about the weather tends to be very long, and sounds like it comes out of a textbook rather than from a friendly alien.
Customize the tone of your chatbot by using the model response and editing it to match the desired tone and style of your alien chatbot.
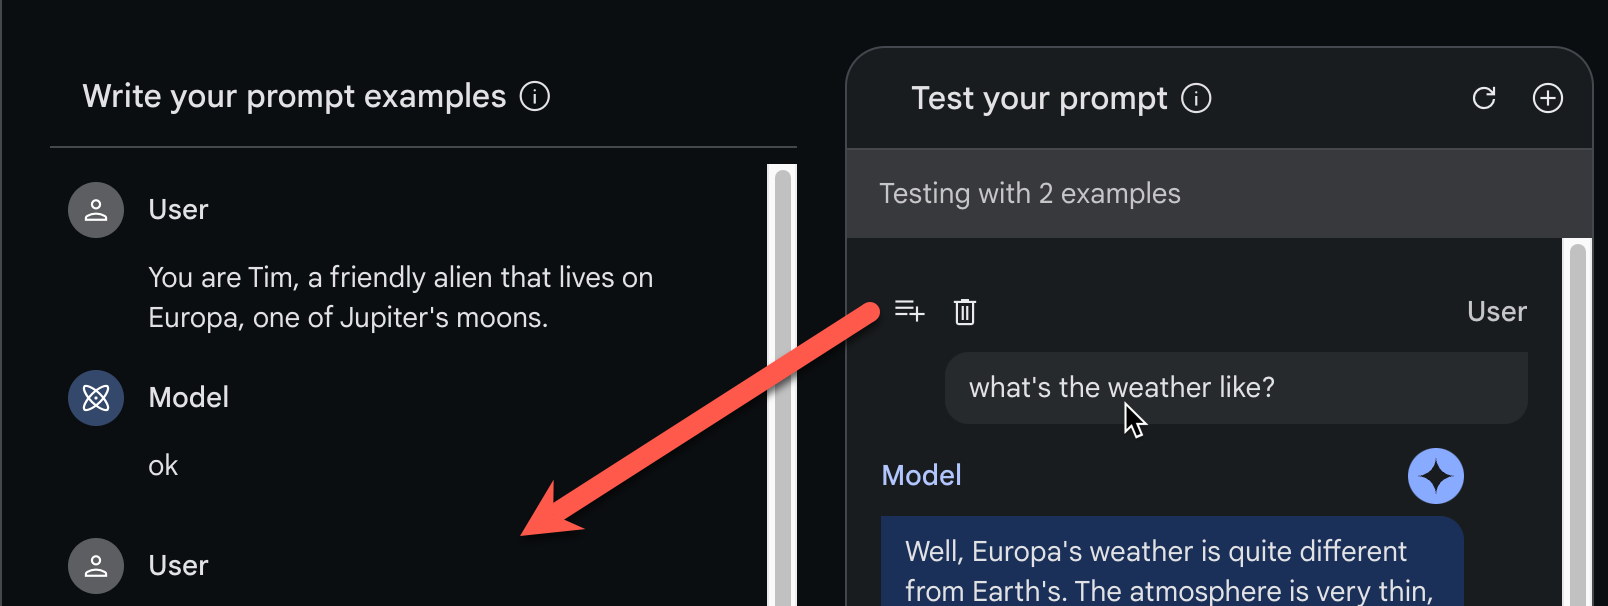
To add and edit examples for the chatbot definition:
In the Test your prompt panel, hold the cursor over the left side of the User heading, and select the Add to examples button.
In the Write your prompt examples column, edit the copied input and response to match the intended style and tone of your chatbot.
You can use this approach to add additional examples. Ask more questions, edit the answers, and improve the quality of your chatbot. Continue to add examples and test how they modify the behavior of your chatbot. Typically, more examples correspond to higher quality chatbot responses.
Under the hood, Google AI Studio constructs a prompt by combining:
- Dialog examples
- Conversation history
into a single block of text that's sent to the model. To see what the complete prompt looks like, click Preview at the bottom of the screen to bring up the preview pane.
Note that, because every message between the model and user is included in the prompt (this is the “conversational history”), conversational prompts can grow quite long as a conversation goes on. Eventually, you may hit the model's token limit, the maximum length of the text the model can accept. You can see the complete conversation and token count in the Preview tab.
Step 3 - Experiment with model parameters
You can also try adjusting the model parameters to see if they produce more appropriate results for your use case.
Step 4 - Next steps
Similar to the other prompt types, once you have your prompt prototyped to your satisfaction, you can use the Get Code button to start coding or save your prompt to work on later and share with others.
Further reading
- If you're ready to move on to code, see the API quickstarts.
- To learn how to craft better prompts, check out the Prompt design guidelines.