
Writing code can be both rewarding and satisfying, but getting your code from working to presentable for colleagues is frequently a chore. Artificial intelligence generative models can help you add code comments, find mistakes before your human reviewers do, and perform a host of other tasks to make your coding workflow easier.
This tutorial shows you how to extend Pipet Code Agent, an AI-powered code assistance tool built by the AI Developer Relations team at Google. This open source project is an extension for Microsoft Visual Studio Code (VS Code) that helps you take care of some of the important, but less fun tasks of coding, such as commenting your code, finding mistakes, and suggesting improvements. The extension sends coding assistance requests to the Gemini API and incorporates the replies into your code editing window.
You can modify Pipet to make these existing functions work better for you, or build new commands to better support your development workflow.
For a video overview of the project and how to extend it, including insights from the folks who built it, check out AI Code Assistant - Build with Google AI. Otherwise you can get started extending the project following the instructions below.
Project setup
These instructions walk you through getting the Pipet Code Agent project set up for development and testing. The general steps are installing some prerequisite software, setting a few environment variables, cloning the project from the code repository, and running the configuration installation.
Install the prerequisites
The Pipet Code Agent project runs as an extension of Microsoft Visual Studio
Code, and uses
Node.js and the npm tool to manage
packages and run the application. The following installation instructions are
for a Linux host machine.
To install the required software:
- Install Visual Studio Code for your platform.
- Install
nodeandnpmby following the installation instructions for your platform.
Clone and configure the project
Download the project code and use the npm installation command to download
the required dependencies and configure the project. You need
git source control software to retrieve
the project source code.
To download and configure the project code:
- Clone the git repository using the following command.
git clone https://github.com/google/generative-ai-docs
- Optionally, configure your local git repository to use sparse checkout,
so you have only the files for the Docs Agent project.
cd generative-ai-docs/
git sparse-checkout init --cone
git sparse-checkout set examples/gemini/node/pipet-code-agent/
- Navigate to the Pipet Code Agent project root directory.
cd generative-ai-docs/examples/gemini/node/pipet-code-agent/
- Run the install command to download dependencies and configure the project:
npm install
Configure and test the extension
You should now be able to test your installation by running Pipet Code Agent as a development extension in VS Code on your device. The test opens a separate VS Code Extension Development Host window where the new extension is available. In this new window, you configure the API Key the extension uses to access the Google Gemini API.
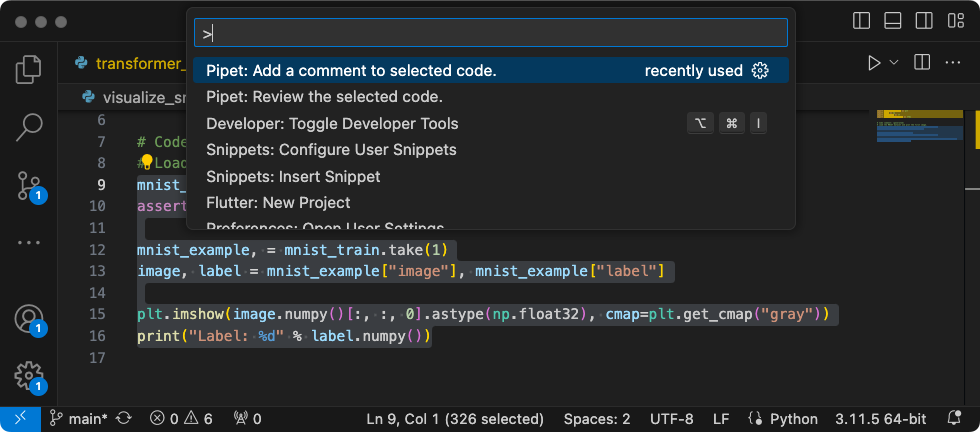 Figure 1. VS Code Extension Development Host window with the Pipet
extension commands.
Figure 1. VS Code Extension Development Host window with the Pipet
extension commands.
To configure and test your setup:
- Start the VS Code application.
- In VS Code, create a new window by selecting File > New Window.
- Open the Pipet Code Agent project by selecting File > Open Folder,
and selecting the
pipet-code-agent/folder. - Open the
pipet-code-agent/package.jsonfile. - Run the extension in debug mode by selecting Run > Start Debugging. This step opens a separate VS Code Extension Development Host window.
- Open the VS Code settings by selecting Code > Settings > Settings.
- Get a Google Gemini API Key from the Generative AI Developer site, and copy the key string.
- Set the API key as a configuration setting. In Search Settings
field, type
pipet, select the User tab, and in the Google > Gemini: Api Key setting, click the Edit in settings.json link, and add your Gemini API key:"google.gemini.apiKey": "your-api-key-here"
- Save the changes to the
settings.jsonfile and close the settings tabs.
To test the extension commands:
- In the VS Code Extension Development Host window, select any code in the editor window.
- Open the command palette by selecting View > Command Palette.
- In the Command Palette, type
Pipetand select one of the commands with that prefix.
Modify existing command
Modifying the commands provided in Pipet Code Agent is the simplest way to change the behavior and capabilities of the extension. Both the comment and review commands use a few shot prompting approach with examples of code and comments for that code, as well as some general instructions for the AI generative model. This prompt context information guides the Gemini generative model in forming a response. By changing the prompt instructions, examples, or both in either the comment or review commands, you can change how each of the existing commands behave.
This set of instructions explains how to modify the review.ts command by
changing the prompt text of the command.
To prepare to edit the review.ts command:
- Start the VS Code application.
- In VS Code, create a new window by selecting File > New Window.
- Open the Pipet Code Agent project by selecting File > Open Folder,
and selecting the
pipet-code-agent/folder. - Open
pipet-code-agent/src/review.tsfile.
To modify the behavior of the review.ts command:
- In the
review.tsfile, change the beginning of PROMPT constant to different instructions.const PROMPT = ' Write review comments for following code, identifying bugs and ways to improve code quality. Examples of bugs are syntax errors or typos, out of memory errors, and boundary value errors. Examples of improving code quality are reducing complexity of code, eliminating duplicate code, and ensuring other developers are able to understand the code. ${CODE_LABEL} ... - Optionally, in the
review.tsfile, add another example to the list of code and code review examples.... ${REVIEW_LABEL} There are duplicate lines of code in this control structure. ${CODE_LABEL} const fixed_value = 128; ${REVIEW_LABEL} Make sure constant names are in all capitals (FIXED_VALUE) for clarity. '; - Save the changes to the
review.tsfile.
To test the modified command:
- In your VS Code Pipet extension project window, restart the debugger by selecting Run > Restart Debugging.
- In the VS Code Extension Development Host window, select any code in the editor window.
- Open the command palette by selecting View > Command Palette.
- In the Command Palette, type
Pipetand select the Pipet: Review the selected code command.
Create new command
You can extend Pipet by creating new commands that perform completely new tasks
with the Gemini API. Each command file (comment.ts and review.ts) is mostly
self-contained, and includes code for collecting text from the active editor,
composing a prompt, connecting to the Gemini API, sending a prompt, and handling
the response.
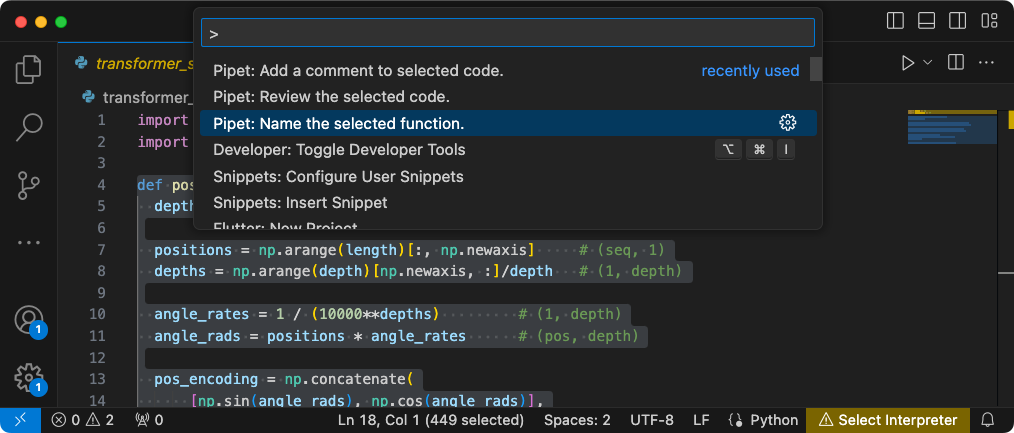 Figure 2. New function name recommendation command in the VS Code Extension
Development Host window.
Figure 2. New function name recommendation command in the VS Code Extension
Development Host window.
This set of instructions explains how to build a new command using the code of
an existing command, comment.ts, as a template.
To create a command that recommends names for functions:
- Make a copy of the
pipet-code-agent/src/comment.tsfile calledname.tsin thesrc/directory. - In VS Code, open the
src/name.tsfile. - Change the prompt instructions in the
name.tsfile by editing thePROMPTvalue.// Provide instructions for the AI generative model const PROMPT = `Recommend a name for this function. Explain your reasoning in 3 sentences or less:`;
- Change the name of the command function and its information message.
export async function generateName() { vscode.window.showInformationMessage('Generating function name...'); - Update the prompt assembly code to include just the
PROMPTvalue and the text selected in the editor.// Build the full prompt using the template. const fullPrompt = `${PROMPT} " ${selectedCode} " `; - Change the response output to describe what it is generating.
// update prefix to describe output let commentIntro = padding + commentPrefix + "Recommended name: (generated)\n"; editBuilder.insert(selection.start, commentIntro); editBuilder.insert(selection.start, pyComment); - Save the changes to the
review.tsfile.
Integrate the new command
After you complete the code for the new command, you need to integrate it with
the rest of the extension. Update the extension.ts and package.json files to
make the new command part of the extension, and enable VS Code to invoke
the new command.
To integrate the name command with the extension code:
- In VS Code, open the
pipet-code-agent/src/extension.tsfile. - Add the new code file to the extension by adding a new import
statement.
import { generateName } from './name'; - Register the new command by adding the following code to the
activate()function.export function activate(context: vscode.ExtensionContext) { ... vscode.commands.registerCommand('pipet-code-agent.nameFunction', generateName); } - Save the changes to the
extension.tsfile.
To integrate the name command with the extension package:
- In VS Code, open the
pipet-code-agent/package.jsonfile. - Add the new command to the
commandssection of the package file."contributes": { "commands": [ ... { "command": "pipet-code-agent.nameFunction", "title": "Pipet: Name the selected function." } ], - Save the changes to the
package.jsonfile.
Test the new command
Once you have completed coding the command and integrating it with the extension, you can test it. Your new command is only available in the VS Code Extension Development Host window, and not in the VS Code window where you edited the code for the extension.
To test the modified command:
- In your VS Code Pipet extension project window, restart the debugger by selecting Run > Restart Debugging, which restarts a separate Extension Development Host window.
- In the VS Code Extension Development Host window, select some code in the editor window.
- Open the command palette by selecting View > Command Palette.
- In the Command Palette, type
Pipetand select the Pipet: Name the selected function command.
Additional resources
For more information about the Pipet Code Agent project, see the code repository. If you need help building the application or are looking for developer collaborators, check out the Google Developers Community Discord server.
Production applications
If you plan to deploy Docs Agent for a large audience, note that your use of the Google Gemini API may be subject to rate limiting and other use restrictions. If you are considering building a production application with the Gemini API like Docs Agent, check out Google Cloud Vertex AI services for increased scalability and reliability of your app.