
Assemble, run, and customize a slides reviewer Add-on for Google Workspace Slides with this code project. Whether you do one presentation a week or one a year, most of us could use a little help getting them right. Do you tend to put too much in a slide? Maybe you forget to break up your presentation with visuals? You might even have a set of guidelines from your organization on effective presentations. Have you read those lately?
The Slides Advisor project is an open source, Google Workspace Add-On that uses artificial intelligence (AI) technology to review and give feedback on your presentations, whenever you need it. The project uses Google's Gemini API image and text processing features to analyze your Google Slides against a set of guidelines and lets you know how you are doing against those guidelines. Even better, you can customize those guidelines to follow your organization's recommendations, or remind you to improve your presentations based on rules you define for yourself.
For a video overview of the project and how to extend it, including insights from the folks who build it, check out AI Slides Reviewer - Build with Google AI. Otherwise, you can get started extending the project using the following the instructions.
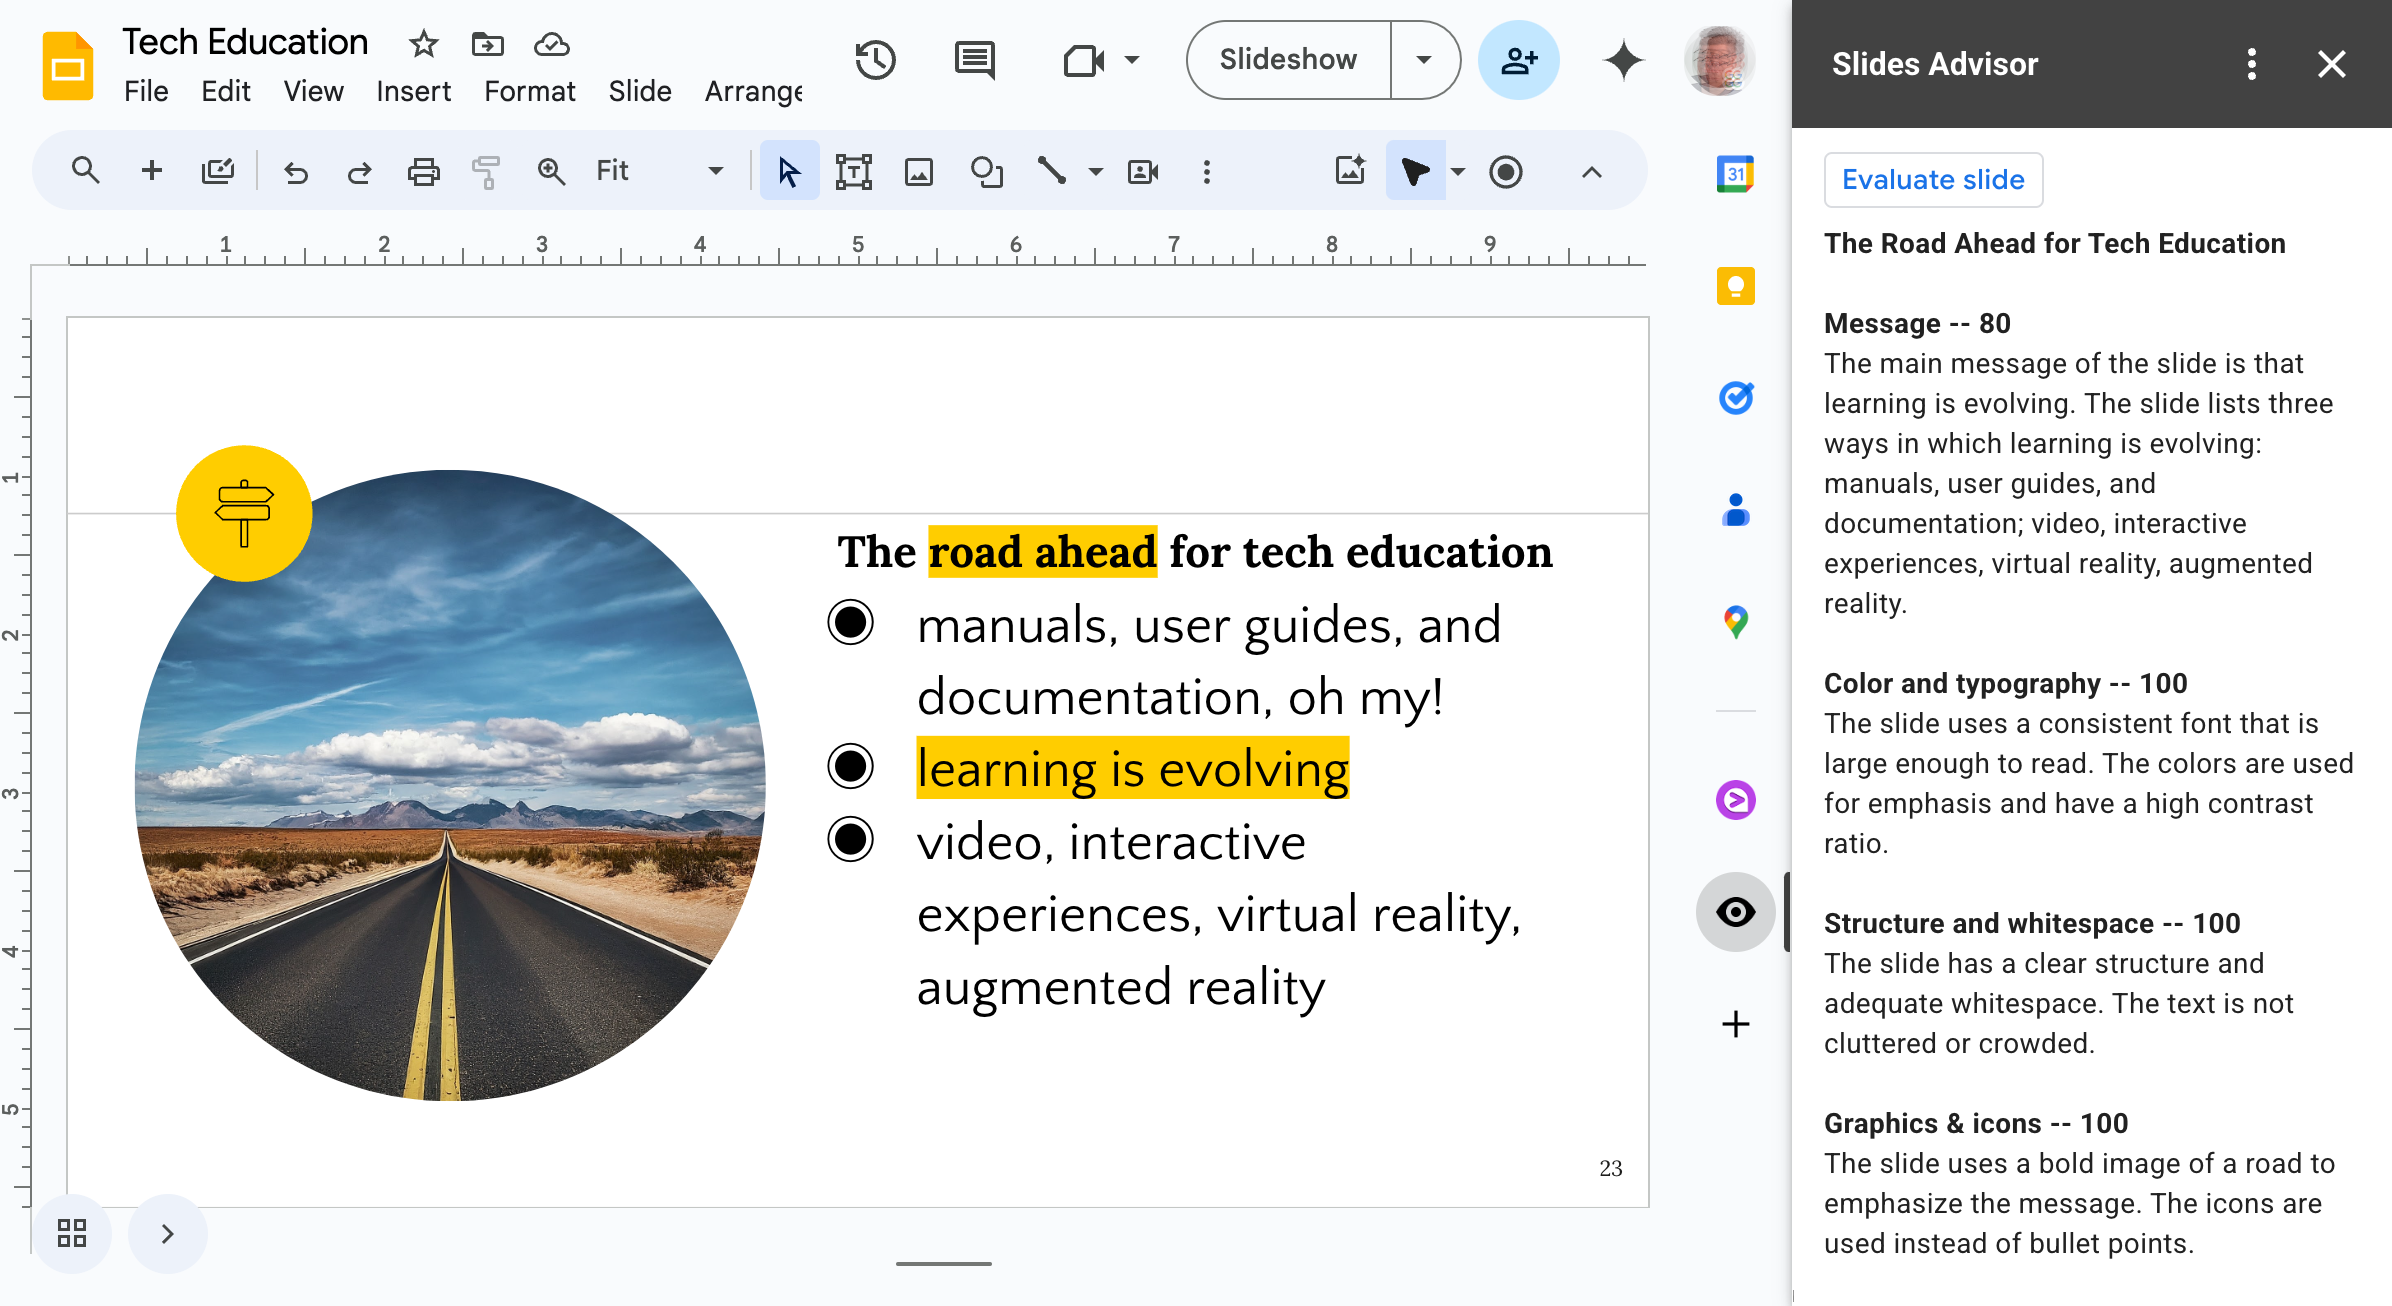 Figure 1. Slides Advisor Add-on for Google Slides running as sidebar panel.
Project setup
These instructions walk you through getting the Slides Advisor project setup for development and testing. The general steps are creating the Google Apps Script project, setting up a Google Cloud project for API access, and setting some Script properties for the project.
Create Apps Script project
This Slides Advisor project runs as an Add-on for Google Slides. You set up the project using the Google Slides web interface, and create an Apps Script project for the code.
To create a new Apps Script project:
- Navigate to the Slides web app for Google Workspace.
- Open an existing presentation, or create a new one.
- In your Slides presentation, select Extensions > Apps Script.
When you complete these steps, you should have a new Untitled project in the Apps Script web user interface, which is attached to the presentation where you started. Name the project to make it easier to find.
To name the Apps Script project:
- In the Apps Script web interface, select the Untitled project text.
- In the Rename Project dialog, type:
My Slides Advisorand then select Rename.
Prepare the project files
The Slides Advisor project has 5 code files, and you need to set up those files before you can copy the code into your new Apps Script project. This section describes how to prepare the project and obtain the code.
To prepare the project files:
- Open the Apps Script web interface containing the My Slides Advisor project.
- On the left side menu select the < > Editor view.
- Rename the Code.gs file to main.gs by hovering over the
Code.gs code filename, selecting Rename from the context menu,
entering
main. The interface adds the .gs extension automatically. - Make the project's appscript.json manifest file visible by selecting the gear icon (Project Settings) on the left side menu, and then enabling the Show "appscript.json" manifest file option.
- In the Apps Script web interface, on the left side menu, select the < > Editor view.
- Create a ui.gs code file by selecting the + (plus) icon to the right
of the Files header, selecting Script and entering
ui. - Repeat the previous step to create the
slides.gsandai.gscode files.
Your Apps Script project should now contain the following 5 code files, which are mostly empty:
- appscript.json
- main.gs
- ui.gs
- slides.gs
- ai.gs
For the next step, get the project code from the repository and copy it into your Apps Script project.
Get the project code
The code for the Slides Advisor project is hosted in a code repository. You need to copy that code into your Apps Script project to work with it. This section describes how to obtain the project code.
To get the project code:
- Navigate the to project code repository for the project manifest file,
appsscript.json - Copy the contents of this code file to your clipboard.
- Navigate back to the Apps Script web interface, select the appsscript.json filename, and paste the code into the code editor panel, replacing any previous code.
- Repeat this procedure for the other 4 code files:
Connect Google Cloud project
This project uses a Google Cloud project to access the Gemini AI models. Google Cloud provides specific data privacy policies, as well as a host of helpful software services for building applications like Slides Advisor. You connect the Add-on code to the Gemini API by creating a Cloud project with AI API access, creating a service account for the project, creating a key for the service account, and installing that key in your Add-on project.
Configure a Cloud project
The Cloud project you use to connect to the Gemini API must have the Vertex AI API service enabled, and you'll need to create an authenticated connection from the Slides Advisor Add-on to this project. The Vertex AI API also requires billing to be enabled in the projects where you use it.
To configure a Cloud project with Vertex AI API access:
- Navigate to the Google Cloud console and sign in, if needed.
- In the Google Cloud console, select an existing Cloud Project, or create a new one.
- In the console Dashboard page for your project, in the APIs panel, select Go to APIs overview, or navigate to https://console.cloud.google.com/apis/.
- In the APIs and Services page, at the top of the page, select + ENABLE APIS AND SERVICES.
- In the API Library page, search for
vertex ai api, select the Vertex AI API option, and then select the Enable button. - If not already active, you must Enable billing for your Google Cloud project, and then enable the AI API by selecting the Enable button on the Vertex AI API console page.
- Verify that the Vertex AI API is enabled by navigating to the APIs and Services page for your project. You should now see Vertex AI API listed on this page.
Create a service account
The Slides Advisor Add-on requires an authenticated connection to your Cloud project to access Vertex AI API and the Gemini models. You create that connection by first generating a service account in your Cloud project that has access to the Vertex AI API. The Slides Advisor project connects using this service account.
To create a service account for the Slides Advisor Add-on:
- In the Google Cloud console, navigate to the APIs and Services page for your Cloud project.
- On the left side of the page, select Credentials.
- At the top of the page, select + CREATE CREDENTIALS > Service account.
- In the Create service account page, Service account details section, enter a service account name, ID and description.
- Create the service account by selecting Create and Continue.
- In the Grant this service account access to project section, select the Role control.
- In the Filter field search and then select the Vertex AI User permission set, and then select Continue.
- Complete the creation of this service account by selecting Done.
For more information on creating service accounts, see the Google Cloud Create service accounts documentation.
Create and install service account key
The Slides Advisor project must be able to authenticate to the service account you created in the previous procedure. You can enable that authentication by creating a key for the service account and configuring that key in your Slides Advisor Apps Script project as a Script Property. The following procedure explains how to create the key and configure it in your project.
To create and configure a service account key:
- In the Google Cloud console, navigate to the APIs and Services page for your Cloud project.
- On the left side of the page, select Credentials.
- In the Service Accounts section, find the service account you created, select the account email address or the pencil icon to edit it.
- In the service account editing window, near the top of the page, select the KEYS tab title.
- In the Keys section, select Add Key > Create new key.
- In the Create private key for... dialog, select JSON and then Create. This step creates a key file named projectid-hashcode.json and automatically downloads it to your computer.
- Open the downloaded projectid-hashcode.json file and copy the contents.
- Open the Apps Script web interface containing the My Slides Advisor project and on the left side menu select the Settings view.
- In the Script Properties section, select the Edit script properties button, and then the Add script property button.
- In the new Property field, enter
SERVICE_ACCOUNT_KEY, and in the Value field, copy in the contents of the downloaded projectid-hashcode.json file. - Save the new property by selecting the Save script properties button.
For more information on creating service account keys, see the Google Cloud Create and delete service account keys documentation.
Test the Add-on project
 Testing the Slides Advisor project requires that you create a test deployment
of the Add-on code, and install that test deployment. In this testing
configuration, the project is only available in the Google Slides presentation
where you started the Apps Script Add on project, and in no other Slides
presentations. You can learn more about deploying your Add-on for wider use in
the Google Workspace Apps Script documentation,
Create and manage deployments
topic.
Testing the Slides Advisor project requires that you create a test deployment
of the Add-on code, and install that test deployment. In this testing
configuration, the project is only available in the Google Slides presentation
where you started the Apps Script Add on project, and in no other Slides
presentations. You can learn more about deploying your Add-on for wider use in
the Google Workspace Apps Script documentation,
Create and manage deployments
topic.
To deploy and test the Apps Script project code:
- At the top of the Apps Script web interface, select Deploy > Test deployments.
- In the Test deployments dialog, next to Select type, select the gear icon and Google Workspace Add-on.
- Next to Application(s): Slides title, select the Install button.
- Leave the default settings for Test latest code and select Done.
- Navigate the Google Slides presentation connected to your Apps Script project and reload the web page.
- On the bottom right corner of the Slides web app, select the ( < ) icon to open the side panel, then select the black and white eye icon to open the Slides Advisor panel.
Once you complete this step and successfully run the Add-on, you can start modifying it to use different guidelines or follow a different workflow. See the next sections for instructions on how to make some basic modifications to the Slides Advisor Add-on.
Modify the review behavior
You can change the review behavior of the Slides Advisor, both in terms of what output you get from the Gemini API, and the user interface provided by the Add-on, by modifying its project code. This tutorial focuses on changing the prompting instructions to modify the presentation slide review behavior. For more information on extending Google Slides user interface using Apps Script, see Extending Google Slides.
Change review guidelines
The Slides Advisor comes programmed with a basic set of slide review guidelines with categories for simplicity, color and typography, structure and whitespace, and graphics and icons. The review guidelines are just text instructions included in a prompt through the Gemini API, along with a snapshot image of a selected slide and any speaker notes.
You can change the review behavior of the Add-on by changing the text instructions. For example, you can instruct the Gemini model to output the review with the category rating on the same line as the category heading, or change the name of a category.
To change the category rating location and a category name:
- Open the Apps Script web interface containing the My Slides Advisor project. If necessary, navigate to the project window by opening the Google Slides presentation containing the Apps Script project and selecting Extensions > Apps Script.
- On the left side menu, select the < > Editor view, and then select ai.gs filename.
- In the ai.gs code file, locate the
SYSTEM_PROMPTstring constant and modify the instructions as follows with the text in bold:const SYSTEM_PROMPT = ` ... For each of the following categories evaluate the given slide. Score each category on a scale of 0 to 100, show the score next to the category heading, and concisely explain the reasoning. Do not suggest improvements if the score is 80 or above.
- In the same
SYSTEM_PROMPTstring constant, change theSimplicitycategory text toMessage:const SYSTEM_PROMPT = ` ... * Message -- Slides should focus on one main idea per slide and ...
- Save the changes to the ai.gs code file.
- Navigate the Google Slides presentation connected to your Apps Script project, reload the web page, and test the changes to the Add-on by re-running it.
If you have not already set up a test deployment for the Slides Advisor Add-on, follow the instructions in Test the Add-on project.
You can remove, replace or rewrite the review category instructions in the
SYSTEM_PROMPT string constant to match your review requirements. If you want
to try out different review prompt approaches or rewrite the whole review
prompt, check out the Google AI Studio web
application. This app lets you prototype, test, and save prompts for Gemini in a
convenient interface, and it uses the same Gemini API as the Slides Advisor
project. For more information on using AI Studio, see the
AI Studio quickstart guide.
Change model behavior configuration
The Gemini API provides several settings for changing the general operation of the model in response to a request prompt. In particular, the temperature setting for the model lets you set how much variation the model is allowed in a response, with zero being the lowest and 1 being the highest. Setting this value at 0.1 produces very consistent responses, but that behavior may seem repetitive and less helpful for users getting review feedback. Consider setting the temperature value higher, and keep in mind that the higher the temperature, the more inconsistent your results can be, which can include implementing instructions differently, and even ignoring some instructions completely.
To increase the temperature for review responses:
- Open the Apps Script web interface containing the My Slides Advisor project.
- On the left side menu, select the < > Editor view, and then select ai.gs filename.
In the ai.gs code file, locate the
analyzeSlides()function and modify thegenerationConfigconstant by setting thetemperaturevalue to0.3:function analyzeSlides(slide) { const generationConfig = { temperature: 0.3, maxOutputTokens: 1024 * 2, };Save the changes to the ai.gs code file.
Navigate the Google Slides presentation connected to your Apps Script project, reload the web page, and test the changes to the Add-on by re-running it.
For more information on model behavior configuration settings, see the Gemini
API documentation for
GenerationConfig.
Additional resources
For more information about the Slides Advisor project, see the code repository. If you need help building the application or are looking to collaborate with other developers, check out the Google Developers Community Discord server. For more Build with Google AI projects, check out the video playlist.